

ASL NAME DRAWING

1. Choose your letter
-
You must choose the first letter of your first name OR the first letter of your last name.
-
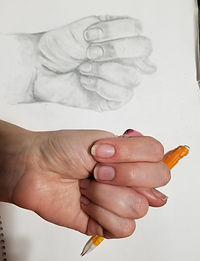
You will draw your hand in A.S.L. (American Sign Language).
-
Remember to draw the palm side of your hand in A.S.L.

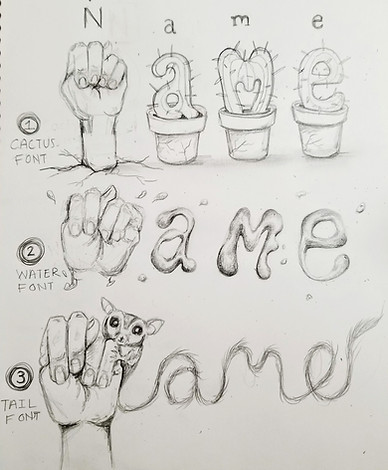
2. Make 3 thumbnail sketches with different fonts
-
"Thumbnail sketches" are a term used for small practice sketches. They are not extremely detailed but they help get an idea of layout.
-
You can use 1001fonts.com for ideas.
-
Come up with an interesting font that relates to you. You can use objects and even have them interact with the hand.
-
Be creative.
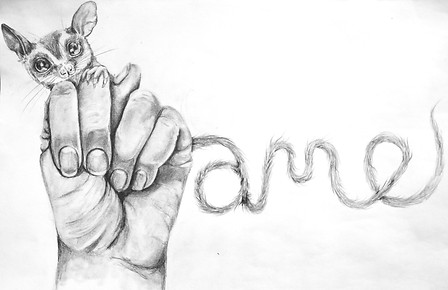
3. Draw your hand for the final piece
-
You must draw it lifesize on your paper.
-
It must look realistic.
-
Make sure your proportions are accurate. You can trace the outline of your hand on your paper to get the proportions as close to life size as you can.
-
Shade the hand correctly with shadows and highlights. I would use a graphite pencil (the same #2 pencil you use in school) and a paper shader/ tortillion.
-
Get rid of outlines (outlines make it look like a cartoon). You can erase the outlines or blend them in.
-
Keep looking at your hand. Do NOT make it up in your head. Draw what you see.
-
-
Watch the youtube video for extra help.


4. Add the font
-
Choose one of the fonts that you practiced and put it next to the hand.
-
Remember- the first letter of your name is the ASL hand. You do not need to add it.
5. Turn it in!
Turn in:
-
Practice 3 font drawings
-
The Final Drawing
-
Self Evaluated Rubric
Remember: Make a folder with your name and upload photos of your sketches and final. Label each one as well.


STUDENT ARTWORK
ASL Name Drawings


